
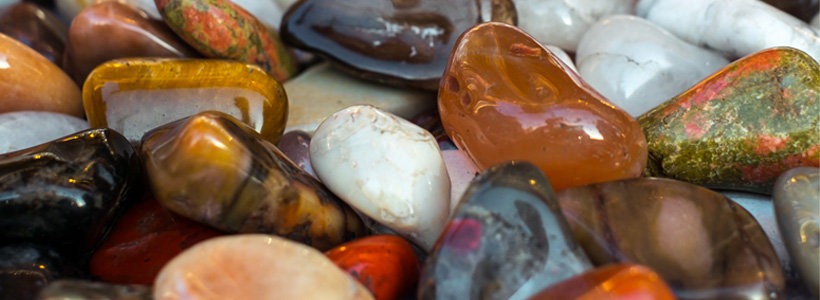
Rock tumbling is the hobby of collecting a wide range of rocks and turning them into beautiful gemstones you can use to make jewelry, crafts, decorations, or just to collect for fun.
Pro tip: see our guide to the best rock tumblers for both kids and adults.
It’s a pretty simple hobby that can be enjoyed at home by the entire family. All you need is a tumbler, some rocks, and a few other inexpensive materials.
Have you ever picked up a rock on the beach or a river bed that was perfectly rounded and smooth to the touch?
That’s a rock that has been ‘tumbled’ by mother nature (water and sand) over the course of hundreds and even thousands of years.
Rock tumbling as a hobby is the exact same process. The thousand years it would take nature to tumble a rock can easily be done at home in a matter of weeks.
Now that’s pretty neat!
In this guide:
- What is a rock tumbler?
- A brief history of rock tumblers
- What to do with tumbled rocks
- Where to find rocks to tumble
- Which rocks NOT to tumble
- Types of rock tumblers
- Supplies
- Four stage process
- Common questions
What is a rock tumbler?
A rock tumbler is a very simple device.
It’s a small machine that turns a barrel round and round non-stop for weeks at a time.
Inside the barrel are your rocks, water, and grit. The grit is what makes your rocks smooth and acts as the sand that nature uses to smooth and polish your rocks.
Grit comes in several levels of coarseness. Think of it like sandpaper.
When you start your project, you’ll want to use a very coarse grit to knock down the sharp edges of your rocks.
Then every couple of weeks, you’ll move on to a slightly finer grit until you reach the final stage where the grit is almost like a fine powder.
Check out our in-depth article all about rock tumbler grit.
A brief history of rock tumblers
While nature has been tumbling rocks for millions of years, rock tumbling machines have only been around since the 1950s.
It was a way to take uncut rocks from nature, and turn them into gemstones that could be made into jewelry.
The process of rock tumbling gained popularity very quickly. By the 1960s, dozens of companies in the U.S had begun to manufacture tumblers.
Barrels of tumblers were first made out of paint cans and eventually evolved to use better materials like rubber and plastic.
While the industry started with dozens of manufacturers, only two were able to rise to the top and become the brands of choice: Lortone and Thumler’s.
Both of these brands still exist today and cater to both rockhound hobbyists and lapidary professionals.
In addition to the professional-grade tumblers, there are a few brands of ‘toy’ tumblers that are perfect for kids. The more well-known brands are National Geographic and Smithsonian.
What to do with tumbled rocks
You’ll find that people love rock tumbling for a number of reasons.
While many folks just love collecting a wide range of rocks to hold and display proudly, there are lots of other reasons why people get into rock tumbling.
Here are some of the more common uses for tumbled rocks:
- Jewelry making
- Various craft making
- Vase/planter filler
- Holiday decorations
- Keychains
- Magnets
- Paperweights
Where to find rocks to tumble
Now that you know the basics of rock tumbling and what you can do with tumbled stones, let’s talk about how and where to find rocks.
What makes a rock good for tumbling?
It should be very hard, nonporous, and have a somewhat smooth surface (i.e., not gritty).
Some of the more popular types of rocks that fit these characteristics are agate and jasper – both common forms of quartz. See my guide to the best rocks to tumble.
While you can buy any of these rocks online or at your local rock shop, I personally find it way more exciting to find them in nature (although not always realistic). For me, the thrill of the hunt is a big part of rock tumbling.
Agate is probably the most popular rock to work with because it’s translucent and has so many unique patterns and designs. It’s a type of quartz and shines up to be real beauties.
In the United States, agate is typically found in Western states – particularly in Oregon, Arizona, Montana, Wyoming, South Dakota, and Michigan.
These rocks are typically found in coastal areas, lakes, and places with a past of volcanic activity.
It’s best to visit rocky beaches during low tide. Sometimes the agates will be laying right on top and other times they’ll be buried between other rocks. Either way, they’re pretty easy to spot.
I love this video of Tim Blair finding agates on some rocky Washington beaches.
Jasper is another form of quartz that’s quite popular and easy to find. In the United States, it’s also most commonly found in Western states like Oregon, Idaho, Washington, California, Arizona, and Utah. You can also find them in Texas and Arkansas.
As with any rock hunting, your best bet will be to pick up a guidebook for your area to see what’s abundant, and how best to find them.
Which rocks NOT to tumble
As I talked about above, you want to pick rocks based on their hardness according to the Mohs scale.
The Mohs scale was formed in 1812 by Friedrich Mohs (a German geologist).
In a nutshell, it’s a scale from 1-10 that measures a rock’s scratch resistance (or hardness).
The lower the number, the softer the rock. For tumbling, it’s best to stay in the seven range.
This is where quartz falls.
Here is a great visual from the National Park Service.
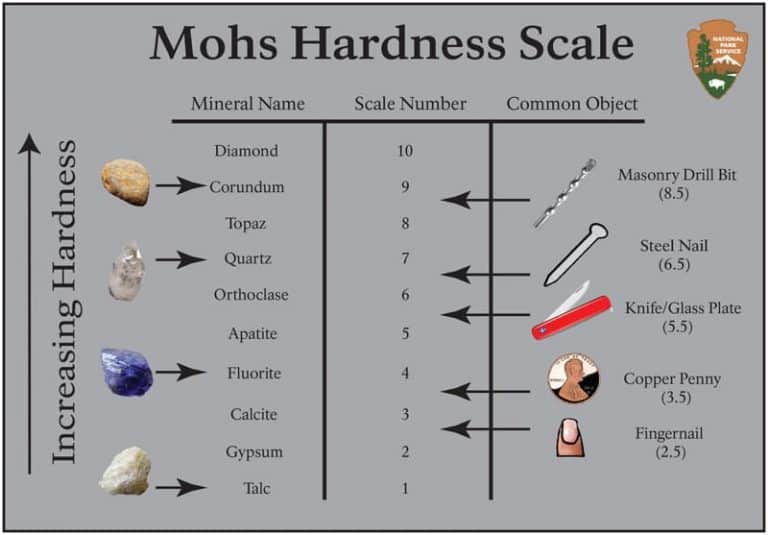
You can see that talc is so soft that it can be scratched with just a fingernail. Harder minerals require steel nails and masonry drill bits to leave a scratch.
Rocks that are too soft or too hard can be tough to polish and not recommended for a beginner.
Examples of rocks that are too soft would be soapstone and marble. Examples of rocks that would be considered too hard would be gem varieties of corundum like ruby and sapphire.
Diamonds would also be considered too hard.
Types of rock tumblers
There are two different types of rock tumblers – rotary and vibratory.
Rotary tumblers are much more common and best for beginners. When most people picture a rock tumbler, they’re thinking of a rotary.
This is the type of tumbler that will knock off the edges, shape, and smooth out rough rocks during the coarse grind stage.
Rocks tumbled in a rotary tumbler will change shape and become rounded.
Vibratory tumblers are less common with beginners and are typically used for fine polishing rocks you’ve already shaped. A vibratory tumbler will not shape your rocks like a rotary tumbler.
If you just want to polish your rocks and maintain the same shape and angles, then a vibratory tumbler may be for you.
The main advantage of a vibratory tumbler is that it dramatically speeds up the tumbling process for stages AFTER your rocks have been shaped (i.e., medium grind, fine grind, and polish).
So while each of the four stages in a rotary tumbler can take a week on average, stages 2-4 can all be done in only one week.
An ideal setup would be to buy both a rotary and vibratory tumbler.
This way you can do your coarse grind and shaping during the first week in your rotary, then switch over to your vibratory the next week to handle the other stages.
If you’re buying a rock tumbler for the first time, go with a rotary.
Best rotary tumblers
Rotary tumblers range in size and price depending on how many rocks you want to tumble at the same time.
Sizing is expressed in pounds. A three-pound tumbler will hold about two pounds of rock (and one pound of water and grit).
You can also get a double-barrel rotary tumbler.
These are great if you’re tumbling two different kinds of rocks at the same time especially if they’re a different hardness.
Remember, always tumble rocks together of similar hardness. This is especially true in the polish stages.
If you really wanted, you could tumble rocks together of different hardness in stages one and two. But be sure to separate them before stage three and four!
Another good reason to have a double barrel tumbler is if you have two batches of rocks in different stages.
So for example, if you start the coarse grind process on one batch, then a week later you want to start another batch. You can use one barrel for the new batch’s coarse grind, and use the second barrel for first batch’s medium grind.
It’s like having two tumblers for the price of one!
If you’re just looking to tumble a larger amount of rocks as one batch, don’t buy a double barrel. It’s much easier to manage a single barrel that’s double the size (only one barrel to clean and maintain).
The two brands you want to look for when buying a rotary rock tumbler are Lortone and Thumler’s.
The most popular Lortone tumbler for beginners is the 3A Single Barrel rotary.
See our complete guide on Lortone tumblers here.
The most popular beginner rotary tumbler from Thumler is the Model T 3lb single barrel.
Thumler’s also makes a very popular mid-sized tumbler called the Model B. You can read our review here.
Both of these tumblers have 3 lb barrels. You can’t go wrong with either.
Supplies
Once you’ve picked out your tumbler, you’ll need a few more supplies such as:
Grit
When you’re first starting out, stick to the simple four-step process (coarse, medium/fine, pre-polish, and polish).
The four stages of grit you’ll want to use are:
- 60/90 silicon carbide for initial grinding and shaping of rocks.
- 120/220 silicon carbide for smoothing surface after initial shaping.
- Pre-polish aluminum oxide for preparing rocks for the final polish.
- Polish aluminum oxide for the final polish.
The exact type of grit may differ depending on which tumbler you’re using so always refer to the instruction manual that comes with your machine.
You can buy all four levels of grit as a kit from your local rock shop or on Amazon.
Plastic pellets
You’ll want to have these on hand for small tumble loads when you don’t have enough rocks to fill the entire barrel. These are great for taking up the empty space in the tumbler and help to deliver more of the polish to your rocks.
Pellets also help to ‘cushion’ the impact of rocks in your tumbler, and can even speed up the process since they encourage more tumbling and less sliding in the barrel.
One batch of these is all you need to last quite a while as they can be reused. Also, pellets should only be used in rotary tumblers – never in vibratory.
As an alternative to plastic pellets, some folks like to use other materials like corn or walnut shells.
If you end up becoming a serious rockhound, you may eventually look into things like slab saws, trim saws, arbors, and oscillating laps. But we’ll save those tools for another time since this guide is for the beginner!
Four stage tumbling process
Now that you have your tumbler and all the supplies you’ll need, let’s go into more detail about each of the four stages of rock tumbling.
Stage 1 – Shaping
As I’ve mentioned a few times already, the first step of the process is shaping with coarse grit. This will remove the rough edges from your rocks and give them a round shape.
To start, fill your barrel about half to two-thirds of the way full. For the best results, you should try to use various size rocks.
If you don’t have enough rocks to fill the barrel, be sure to add your plastic pellets after adding the rocks.
You should also add pellets at this stage if your rocks are fragile or have a flat shape.
The next step is to add your coarse grit (about two tbsp per pound of rock) followed by water to nearly the top edge of your rocks. Close the barrel firmly and clean up any water or debris.
Not everyone will do this next step, but I like to weigh my barrel before starting the machine. Every tumbler has a maximum weight. It’s important to stay under this weight, so you don’t wear out the motor.
Put the barrel on the tumbler, plug her in, and get going!
I should mention here that tumblers can be noisy so you should probably set up in either your garage or basement – or even a shed if it has electricity.
After a few days, you’ll want to check the progress to make sure the edges are being knocked down.
Then after your rocks have been tumbling for about a full week, and they are the shape you want them to be, remove your rocks from the barrel and rinse in a clean bucket of water.
Note that your time may vary depending on the type of rocks you’re tumbling. Harder rocks and rocks with strong angles will take longer to shape than softer, smoother rocks.
If your rocks aren’t the desired shape after the first week, just put them back in for as long as it takes. Just be sure to check on them every day or so.
At this stage, you’ll also want to clean out the barrel with soap and water as you prepare the rocks for stage two of the process. You’ll want to make sure all of the coarse grit is cleaned out of the barrel.
You want to be 100% sure all of the grit is out of the barrel, so you’re not mixing coarse grit with the fine. Some people will even go so far as to use separate sponges for each type of grit when cleaning their barrel.
At all stages of cleaning, don’t ever dump your waste products (slurry) down the drain – unless you happen to be a plumber and like repairing pipes 🙂
Once clean, it’s time to move onto the finer grit.
Stage 2 – Medium/fine grit
Follow the same process as before, again adding pellets if needed. Be sure to clean the pellets good because grit will stick to them. Sometimes it’s easier just to use a new batch of pellets.
Stage two (the finer grit) should take about the same amount of time as stage one.
What you’re looking for here is to remove any visible scratches/cracks/pits and to create a dull glow on the rocks when they’re dry.
Since time here will vary, you should check on your rocks every day or so to see how they’re progressing.
After another full cleaning, stage three is the pre-polish stage.
Stage 3 – Pre-polish
The purpose here is to make your rocks silky smooth and start to bring out a bit of luster.
This stage should also take about a week, but mileage may vary.
One last full cleaning and we’re onto the final stage – polish!
Stage 4 – Polish
This stage is going to use a grit that looks like a fine powder. After another week in this stage, your rocks should come out with a bright shine and look absolutely stunning.
During the polish stage, you should consider using some plastic pellets to protect your rocks from hitting each other.
There’s nothing worse than ruining a batch of rocks after a month of processing!
Finally, there’s a bonus stage that’s not necessary but can boost the brightness of your rocks – especially with agates and jaspers.
It’s called burnishing and is considered an additional stage of polish.
Burnishing
Burnishing is the fifth stage of tumbling, but instead of using grit, you’re using some form of soap or powdered laundry detergent.
This will put even more shine on your rocks, brighten them up, and remove any haze and residue from the slurry.
If you’re not sure whether the burnish stage will add more brightness to your rocks, a simple test can be done.
Take one of your rocks and buff one side with a very soft cloth for 10-20 seconds.
If the side you buffed is shinier than the other sides, it will benefit from a burnishing stage.
Most people will either use borax or shaved layers of ivory bar soap.
Whatever you use, make sure there are no additives in the soap that will harm your rocks. Also, be sure to add your plastic pellets for protection.
The ratios here are the same as in the grit stages. About two tbsp per pound of rock is recommended.
All you need is 24 hours in a rotary tumbling during this stage. But the longer, the better!
Tip: during both the polish and burnish stage, you may want to batch your rock types.
Since you’ll mostly be tumbling types of quartz as a beginner, group them all together for these last two stages. Remove all other families of rock.
So there you have it. The complete process for tumbling rocks in your rotary tumbler. Expect to wait 3-6 weeks on average to complete the entire process.
Remember, patience is a virtue!
Common questions
In this section, I want to address some of the more common questions I see about rock tumbling.
While each of these questions likely deserves their own post, I’ll try to be as brief as possible with my answers.
Can my rock tumbler be used for other things like shells, glass, or coins?
Absolutely! Let’s talk briefly about each of these.
Shells
You can tumble seashells in a rock tumbler – as long as they’re not too thin.
But you’ll want to change up the process a bit. The same process used for hard rocks will not work for shells.
Shells are very soft and fragile, so you’ll want to skip the coarse grit stage, and give very little time to stage two – if any.
Because shells are so fragile, you’ll want to fill your barrel up as much as possible, using as much filler as you can.
Since tumbling shells is more about the polish stages, you may want to consider a vibratory tumbler instead of a rotary.
Glass
Don’t you love walking on the beach and finding a piece of naturally tumbled sea glass? Well you can actually make your own sea glass at home in your rock tumbler
As a rule, you don’t want to tumble anything less than ¼” thick as it will just fall apart in your tumbler.
Stick to a thick glass like the kind found in stained glass windows or even landscaping glass.
You can even use glass that you find on the beach that nature has already started to tumble.
Glass is considered slightly harder than seashells, but still not as hard as your average quartz.
So you’ll want to be delicate in your tumbling process, and cut down on the time in each stage – especially stage one and two!
Like shells, be sure to use plenty of filler to cushion the glass.
Coins
If you’re into metal detecting and tend to find a lot of stained and crusty coins, you may want to throw them in the tumbler for a nice, clean shine.
My disclaimer to this is to never clean any coin of value. The moment you clean a coin, it’s no longer worth anything.
A rock tumbler will completely destroy the collector value of your coins.
Typically the coins you’ll want to clean in a tumbler are modern coins that aren’t worth more than their face value or melt value.
For modern clad that you just want to take to the coin machine at the bank, you’ll want to do a quick cleaning or the machine may reject the coins.
Like rocks, you’ll want to tumble coins in groups. For clad, this applies mostly to copper and zinc metals.
Do not mix copper with zinc!
Lincoln pennies that are 1982 and older are copper so you’ll have to separate them from 1983+ zinc pennies, all nickels, dimes and quarters.
Also, any dimes and quarters pre 1965 are silver, so separate those as well.
Instead of grit, a lot of people like to use aquarium gravel and dish soap. Limit your tumbling to a few hours maximum. That’s all you need for some shiny coins!
What magazines and online forums do you recommend?
Interested in a magazine subscription for rock tumbling? Check out some of these:
Want to join a forum where you can connect with fellow rock tumblers? I highly recommend the Rock Tumbling Hobby Forum.
What are some good media (or grit) substitutes?
Depending on what you’re tumbling, there are a few media substitutes you can try including:
- Ceramic pellets
- Aquarium gravel
- Marbles
- Sand
- Walnut shells
- Corn cob
- Stainless steel bb’s
- Tile spacers
- Crushed glass
Please note that for this beginner’s guide, I do not recommend any of the above. Stick to the standard levels of grit recommended by your tumbler’s manufacture.
Whatever medium or filler you decide to go with, be sure it’s right for what you’re tumbling.
There’s no quicker way to damage your rocks than by using the wrong medium.
Where to buy roughs?
If finding rocks in nature isn’t your thing, or you don’t live near a source of the rocks you want to polish, then buy yourself some roughs.
Your local hobby or rock shop will be the best place to buy these since you can also talk to the owner and get some invaluable advice.
But since not everyone lives near a rock shop, most times it makes more sense to buy your roughs online at places like amazon.com.
There are also more specialized sites out there like therockshed.com.
How to maintain tumbler?
Since tumblers will be running 24 hours per day for weeks at a time, it’s important to properly maintain your machine.
Always follow the instructions in the manual of your tumbler. Here are a few general rules to remember:
- Always keep the outside of your barrel clean.
- Apply a very small amount of lubricating oil to the bearings every 30 days of operation.
- Make sure the drive belt has the proper level of tension – not too tight but not too loose.
Like anything else, the more you take care of your rock tumbler, the longer it will last.
How much grit to use?
The amount of grit you use will depend on the type of tumbler, the brand, size, tumbling stage and type/size/shape/hardness of rocks.
To give you a rough idea of how much grit you’ll need so you know how much to buy, you’ll typically want between 2-4 tbsp of coarse and medium grit for your average 3lb rotary tumbler.
For polish stages, usually about 4-6 tbsp for your average 3lb rotary tumbler.
These estimates assume you’re doing a full load of rocks.
Coarse and medium grit usually sells in 16oz containers while polish grit comes in 8-12oz containers.
Your best bet will be to buy a basic four stage kit on Amazon.
Again, there are so many factors at play here. This is just to give you a general idea, so you know how much grit to buy when getting started.
How much rock to use?
How much rock to use in your barrel will depend on the size of the barrel. As a rule of thumb, use 2lbs of rock for a 3lb barrel. The rest of the weight is for grit, filler, and water.
How loud is a tumbler?
A rock tumbler can be quite loud – especially the more inexpensive models typically marketed as toys.
Larger barrel tumblers processing larger rocks will naturally be louder since the large rocks are clanging around, making more noise.
Even small 3lb tumblers can be somewhat loud, so I recommend keeping your tumbler in a separate room altogether – especially a basement or garage.
Where to buy rock tumbling supplies?
I like to buy my supplies from amazon.com. However, you can also get your supplies from sites like rocktumbler.com or therockshed.com.
What is rock tumbling grit made of?
Rock tumbler grit comes in many forms, but the most common are silicon carbide and aluminum oxide.
Silicon carbide will be your coarse and medium grit while aluminum oxide will be your pre-polish and polish grits.
Both of these chemical compounds occur naturally and have been used as abrasives for a very long time.
How to polish rocks by hand without a tumbler?
Rocks that are already shaped and somewhat smooth can be polished by hand if you don’t have a tumbler.
Typically you’ll only want to hand polish soft rocks, as hard rocks will be almost impossible to do by hand.
One quick way to determine this is a simple scratch test.
Scratch the rock with something hard and sharp like a steel file. If you’re able to leave a permanent scratch on the rock, you have a soft rock which will hand polish well.
If you cannot leave a scratch, the rock is probably too hard and is not worth polishing by hand. Your best bet will be to use a tumbler.
All you need to hand polish is different grit levels of wet/dry sandpaper (or emery cloth) and soft polishing cloth material like felt or leather.
The type of sandpaper you want is wet/dry and is the same stuff used on cars. So visit your local auto body paint supply shop if you can’t find this online.
Which rock tumbler is best?
The best rock tumbler will depend on several factors so I can’t make a blanket statement here. It all depends on what you’re tumbling, how much of it, and your level of experience.
I have a separate post on the best rock tumblers for different scenarios which you can find here.
Generally speaking, the two brands I favor are Lortone and Thumler’s. If you’re looking for the best tumbler for kids, then check out this post.
Final thoughts
Rock tumbling is a very fun and rewarding hobby that people of all ages can enjoy.
Whether you’re making and selling jewelry with your rocks or just want to spend some quality time with your family, consider getting yourself a tumbler and try it out for yourself.
Happy tumbling!